Pages

Sunday, November 6, 2016

How I Repurposed An Old Thrift Store Frame

The thrift store is one of my favorite places mostly because I can afford everything and my creative juices get to flowing. On one of these magical trips to a local thrift store I happened upon this frame for just $10!


I loved all the pretty details on the frame and it was in really good condition. I hoped it would be the right size for a painting that Brandon gave me one Christmas of Christ as a young boy sleeping on his mothers lap but alas the frame was too small. So instead I decided to paint it and make it a mirror, and here is how I did it!


Step one was priming the frame so that the paint would adhere nicely (and so that I wouldn't need to sand off the glossy finish)  I typically use Killz primer but I have heard Zinsser is a great option as well. They key to painting a frame or anything with details like this is to be extra cautious that the paint doesn't pool up between all the small creases otherwise you lose some of the depth of these details.

I debated between painting it white & buffing some gold into the creases vs. spraying the entire frame gold and I voted to spray it gold. I looked on Pinterest at different spray paint options and various shades of gold to help me make my choice. Then on a nice sunny day I took it outside to spray it down. As soon as I started spraying it I was glad I chose the gold.


Now on to the part that made me want to do a whole lot of cursing. Sometimes you watch/read tutorials and you think to yourself "piece of cake! I can do that!" and sometimes you're wrong. I'm here to tell you that cutting glass is not as easy as people make it look. But I'm also here to tell you that it's okay to fail once (or twice) because you learn from your mistakes and it makes it all the more gratifying when you finally succeed.

After looking through the online classifieds for a cheap mirror that I could use, I found someone selling an old dresser top mirror for just $5 and jumped on it! Here they are next to each other.
I removed the mirror from the frame, traced out what I needed for the new frame and followed all my glass cutting instructions and this happened...


7 years bad luck


I'm a pretty dang optimistic person, and I have a tendency to think things won't go wrong so when they do it completely catches me off guard and kind of shatters my entire universe. So after pacing around for a while muttering under my breath and trying to figure out how to clean up my mess the optimism kicked back in and I decided it wasn't the end of the world and I could use the rest of the mirror to practice with and figure out where I went wrong.

I learned a couple of things and for starters this particular mirror had an awful plastic-y backing on it that I think is part of the reason it didn't snap in one piece like it was supposed to.
Whatever it was, it was a pain to peel off

 I also think that since I was doing such a large piece I needed help holding my straight edge so that I could focus on applying enough pressure on my glass cutter. So I bought another $5 mirror and volunteered Brandon to help me in round two so that he could hold my straight edge down for me. The second attempt actually went much better with the exception of  my very last cut. The very end snapped off uneven and when I put it into the frame you could barely see the tip that broke off.
So close!!!

It took me a while to come across another cheap mirror for sale but one day Brandon texted me a picture of one he found for me during his lunch break-that's love. So I dove right into round three (and by "dove right into" I mean I stalled for like 2 weeks because I was so afraid of ruining it again) I did the first cut and it went perfectly, so perfectly I wanted to cry. Then I traced the line for the second cut and before I snapped it I jokingly asked Brandon if we should pray. But seriously I may have said a silent prayer/plea in my head begging for it to work. The second snap wasn't perfectly clean but we sanded it down with some heavy grit sandpaper aaaaand TaDaaaaa!!


I'm telling myself that I only spent about $20 for this project which includes the frame, used mirror, and spray paint. The other paints and things I already had on hand, and the failure mirrors are salvageable enough that I'm using them for other projects. Even if I did count those in my final cost it's still cheaper than buying a nice big framed mirror like this. So I'm calling this a win. A big frustrating win.


Monday, October 10, 2016

Kitchen Cabinet Makeover Part 1

Decisions have been and and processes have begun! If you'll remember my last post I was debating what to do with my outdated kitchen cabinets, so I asked lots of friends and did some research and decided to go with my heart and paint them white! And although it's not done yet I just want to show you guys a sneak peak preview because I'm so excited about them!

In my last post we left off with all the uppers being on my kitchen floors, and I'm afraid to say that's kind of where they have sat the past few weeks as we worked on the walls. This last week it was finally the cabinets turn for a little TLC. I'll get into some more detail when I post the full reveal but for today here's some pictures of the progress they have made.

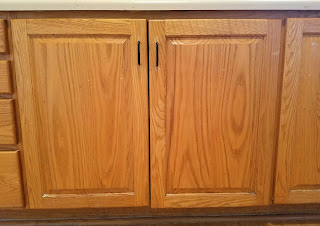
Here's a little reminder of what they looked like before:


After we painted them we put them into one of our spare bedrooms while I finish painting up the kitchen walls this week. Partially so that I wouldn't get any of the wall paint on them and partially so they're not all over the kitchen threatening my sanity. So here they are hanging out in our "classy room" complete with blue carpet and raspberry walls.


I had to make Brandon take this picture because my short arms couldn't get a a decent picture without my belly in it.

Exhibit A. The tum tum.

So that's our progress so far. Thank you to everyone who suggested I go with the white because I am loving the way they're looking! Hopefully I'll post the completed look soon! Thanks for reading!

Friday, September 9, 2016

Updates & Upgrades

"Time flies" is an understatement, I have been meaning to update the blog for so long and before I knew it 3 months passed me by! So here's a post to give you the run down of what's been going on!

For starters we found out back in May that we're having a baby!  It was the night before my birthday and I was wondering if I might be pregnant because of the way I had been feeling (no appetite from the girl who ALWAYS has an appetite) so I was really wanting to take a test but the instructions said that it's best to take it first thing in the morning. Luckily my dear sweet Brandon convinced me to take it that night by telling me that if I took it in the morning and it turned out to be negative it would have ruined my whole birthday (another understatement).  So I took it that night and sure enough there were two little pink lines wishing me a happy birthday!
We told close family & friends right away then officially announced it to everyone on the 4th of July.


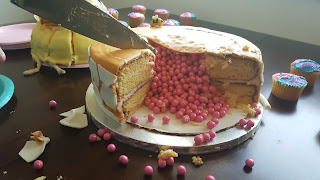
A few weeks ago we found out that the little babe is a girl and we threw a small gender reveal party for our family. My friend Theresa made an AMAZING gender reveal cake inspired by a picture I saw on Pinterest of a cake made by The Artisan Cake Company.
Because we LOVE honeybees!


With that fun news some of our house remodeling got put on the back burner for a short while, but as of Labor Day weekend we are back up and running! Last Saturday evening Brandon and his buddy Alex installed some new closet doors into our master bedroom. As you will see from the pictures I haven't finished painting them, but I had to study some painting techniques to make sure they turn out perfect.

I can't wait to pick out some fun knobs!


After finishing the doors the night was still young so we decided to rip out these box things that closed the space between our kitchen cabinets and the ceiling.  We were under the impression that it would be a pretty simple job to just cut and break them out but it turned into something a little bigger. Behind the drywall of those boxes was plywood, and the walls and ceiling inside of said boxes was non existent. Here's some of the progress and where we left off Saturday evening...


On Monday while the boys did all the grubby grunt work in the kitchen, I went into the master bedroom and ripped up the carpet and the tack boards. And while I know that the sub-floor is nothing special to look at, the bedroom just looks SO much better without that awful purple carpet and it makes me so excited to get it all finished! Here's Mondays progress and how things are looking in the kitchen these days...


 And now a few of my favorite place right now...

Note that the creeper is gone from the bedroom door!
Ahhhh, that feels good. It was so satisfying to get that carpet up. Now we're in the process of finding new carpet and I'm having an internal battle of painting my kitchen cabinets white vs. staining them a darker color. Wish me luck, I'm going to go meditate in my pretty room.


Thursday, May 12, 2016

Sweet Honey Bee

In case you hadn't noticed from our massive social media overflow of bee pictures OUR BEES ARE HERE! And I love the little ladies so much! And we worry over them more than you would imagine. I'll be sitting at work and see that it's raining and I'll think to myself "Oh I hope you girls got back inside before this started coming down!" They are so fascinating to watch and to learn about.

Everyone always asks where the heck we came up with the idea to get bees and to be honest I'm not even sure. All I remember is that about a year ago or more Brandon and his friend Alex started talking about how cool it would be and the next thing you know we have them!

We ordered our honeybees from IFA early in the year (we ordered the Italian bees) and have been attending monthly beekeeping classes. The classes have been so cool, bees are seriously fascinating. For example, our teacher told us that they separate pollen from different flowers in different cells; he once took a toothpick and mixed all the pollen up in the cells and THEY WENT BACK THROUGH AND REARRANGED IT!  Or how about that a queen bee can between 1,500-2,000 eggs per day! I've got fun facts about bees all day long people.

So the bees came the evening of Friday, April 22nd and we picked them up at IFA.Look at all the bees!
We went up to Alex's house first to install his bees and we had to work fast because we were losing daylight. The box came with 3 pounds of worker bees, some drones (male sex slaves,) and a queen that was kept in a separate small box. The whole container was closed with a tin can full of sugar water for them to eat on their trip.


 Here's the box, and as you can see there are some bees that somehow escaped and are hanging out on the outside of the box. I thought it was awesome that they didn't even attempt to fly away, they just wanted to stay with their peeps. We carried the box around and stuck it in the car and they stayed there the whole time.


The first thing we did is set the box inside the hive that Brandon and Alex made.

Then we took out the can feeder that had lots of bees at the bottom still eating.
Then out came the Queen!! 

 The queen is kept separate for a couple of reasons. Firstly, so that the company can essentially prove that they gave you a queen. Second, because the queen and the worker bees were just transplanted together. The workers were all in California working on pollinating the almonds, and the queen came from Texas, or Arizona or something. Since the bees aren't initially loyal to her, there is a risk of them killing her. So she gets her own little box with a small entrance covered in a sugary wax and a cork to keep her safe . Pictured above is Alex's queen box.
Here's me pulling out our queen box
We brushed all the bees off the queen box, removed the cork, and rubber banded her box to one of the bars that covers the top of the hive. Then we closed it up for the night with the hope that the bees would all crawl out of the box and eat the sugar coating on the queens box to let her out.
The next morning

 Overnight quite a few of the bees came out and surrounded her but there were also lots left in the box. So we dumped the rest. It was pretty amazing because the minute we dumped the box the bees that fell out IMMEDIATELY turned and stared walking up to the queen. It was like a small stampede of bees. 

 
Then we closed up the box and did our best not to bug them every day. We do check on them every now and again (weather permitting) and they already have a bunch of comb built up and some honey going. We're a little worried that we're not seeing much brood so let's all cross our fingers that they survive!

Thursday, April 21, 2016

One Mans Trash...

So one day I was driving home and I saw a little white chair on the side of the road and I thought to myself, " I can't believe they're getting rid of that little chair. It's still in pretty good condition, it just needs a little cleaning. Or you could put some fun new fabric on it and revamp the whole thing!" That last thought is the one that did me in. I could do that! So I flipped my car around, parked outside of their house and sat their feeling incredibly awkward for a minute realizing that in a way I was KIND of going through someone's trash. Did that stop me? Of course not, it just slowed me down for a moment. But you better believe I jumped out of my car and loaded it up as fast as a jack rabbit before anyone could see me, and more importantly recognize me. But apparently I'm over that considering I'm telling the world about it now.


Then the chair sat there. And sat there. Because I was a little preoccupied falling in love with my now husband Brandon. And when you're falling in love you don't have any spare time to work on reupholstering chairs. We did, however, LOVE going to see movies at the drive-in and Brandon kept saying how awesome it would be to have a lovesac that we could throw in the back of his truck for when we went. He also had a birthday coming up and so I got it in my head that I could just MAKE a love sac! How hard could it be right? Wrong.  (I promise this is all tied in with the chair story, stay with me) So I bought some plain brown fabric for the inner shell, and went to Hobby Lobby with my sister Jaimie to get some upholstery fabric for the outer cover. And we found the softest prettiest fabric that you could ever imagine. Sure it was more money than I wanted to spend, but Hobby Lobby always has a 40% off coupon available on their website so technically I would be losing money by not buying it . Sure it was floral and this was technically a present for Brandon, but we were getting married so the sac WOULD end up in OUR house and it had to look good.  So I bought it (WITH a little convicing from Jaimie.)
  Then I made the inner shell of the love sac and well....
Not exactly the two person, comfy, lovesac I envisioned and the look on Timmy's face says it all.

"Courtney, your lovesac sucks."
 Be quiet Tim, I know! So I didn't dare waste my beautiful new fabric on it. Then I remembered my chair and felt a little better about all the money I dropped because I could use it for that project! Now on to the good stuff! I have a lot of people ask me how I reupholstered this chair and first of all, disclaimer, I am sure this isn't the professional way of doing it so this is a strict no judge zone.

I started by just using a seam ripper and taking pieces of the fabric apart along seam lines. Then I wanted to save myself from getting a headache later, so I labeled which pieces went where (I never have been one for puzzle doing)


The labeling part seriously came in handy later down the road, so if you do anything like this I would recommend it! Then I just used all the old pieces as a pattern for the new fabric! I laid the new fabric out, pinned the old fabric to it, cut out my shapes, and transferred my labeling to the new pieces.


Once I had everything cut out I started to pin them together according to my labels starting with two of the biggest pieces from the back of the chair. Once I was sure I had them put together correctly I sewed the two new pieces together. I continued by adding one piece at a time until I had all the pieces sewn together. (I failed to get a picture of that) So I slipped it over the chair, stapled the top and the bottom in place and Voila!


The front was the most challenging area, and it shows in the few ripples that are there but for my first time I'm too proud of it to mind them. I continue to debate whether or not I want to stain the legs a darker color but I can't make up my mind. So if you have an opinion on it let me know!  Here's the official before and after.


  Thanks for reading!!

Sunday, April 10, 2016

Welcome!

About a year ago Brandon and I began the fun journey of house hunting- and please note that fun is dripping with sarcasm. It was the moment I entered the real world and realized my dream home with open concept floor plans, big kitchens with granite counter tops, a big backyard, and a man cave for babe was just a LITTLE out of our price range.  So we decided on some things that we weren't willing to budge on, started the hunt, found our home, and signed the forms. It got right down to the wire too-we were able to move in the DAY our contract was up and had to move out of our apartment. Talk about blessings.

And here she is!!
The Front.

And Back.


  And while we don't need to do a major overhaul with this place feel free to join me as we fix things like...

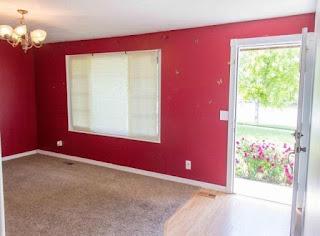
Butterflies in the living room (It's not super obvious from this picture but look closely and you'll see them)
Green kitchens


A VERY purple master bedroom


With things like this painted on all the bedroom doors

I'm super excited because this is my place to put all my before and after pictures. And boy do I love before and after pictures, they just satisfy me like you wouldn't believe. So thanks for checking it out, I'll be sure to start posting some of our first projects soon!